
|
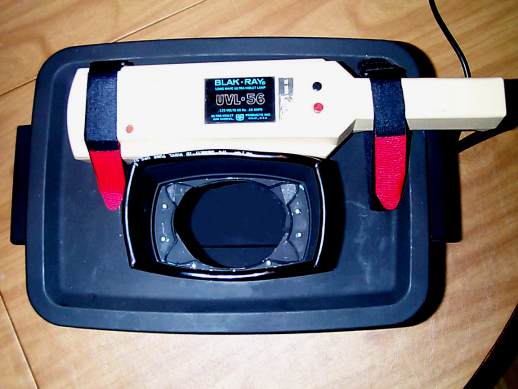
Above: Front view showing
view port with piping (for comfort) of split plastic tubing. The tubing has been epoxied to the edges of
the plastic view port. A 6-Watt
Blak-Ray UV light source has been attached to the cabinet using 2 Velcro
straps. Click on any of the pictures for a better view. |
|
If you’ve always wanted one of these portable darkrooms
for use with your UV light source, but don’t want to pay $175.00 for a
commercial version, here is a very economical alternative. For your investment in $20 worth of common
materials and a couple of hours of work you can have a UV viewing cabinet
that is easily assembled, very durable, lightweight, and that works great. |

|
MATERIAL LIST 1–
Rubbermaid storage bin: 14” x 10” x
7” deep 1– can flat
black spray paint 1– package
of 1/2” wide x 1/4” thick, foam adhesive weather stripping 36” of
black 1/4” vinyl tubing 2- Velcro
straps (length will vary depending on type of UV lamp you have) 14– 1/8”
diameter aluminum pop rivets with 1/4” grip 8– 1/8”
aluminum back-up washers 1- Two-Part
Epoxy System 1– 4” x 6”
piece of black felt 1—plastic
container that is suitable for modification and use as a view port (a plastic
Nestle’s Quik Mix container for example– be creative here and use what allow
comfort and a good viewing field) TOOLS REQUIRED utility
knife, ruler and straight edge for cutting plastic power drill
with 1/8” bit for making pilot holes for rivets pop rivet
gun Scissors
for cutting weather stripping and felt |

|
Left: Rear view showing
access port for UV light source. The
UV access port has been lined with the adhesive foam weather stripping to
allow for a light-tight fit. The
Velcro straps have been riveted to the plastic bin top using the back-up
washers. |

|
Above Right: Side
view showing access port for introducing artifacts. This port is covered with a flap of felt,
which has been riveted to the wall of the bin from the inside (back-up
washers used here too). |
|
Above: Top view showing
view port and viewing field. A portion
of the bottom of the smaller plastic container has been cut away to create a
viewing field. A matching cut was made
through the top of the larger Rubbermaid bin.
Tabs were left in the bottom of the “view port” container to allow the
two pieces of plastic to be riveted together.
Foam weather stripping was placed between the bin’s top and the bottom
of the plastic view port to create a better fit and to close gaps through which unwanted light might
enter. *
NOTE: suitable
safety glasses MUST be
used with this UV viewing cabinet– UV radiation
can be harmful to eyes |
|
Be sure to coat the interior of the
bin and view port with the flat black spray paint—I painted the exterior of
the bin and plastic view port for a uniform look. All of the painting was done after all 3 of
the access ports were cut into the bin and the view port was fabricated and
ready for installation. |